The Ultimate Guide to Getting a Helix Piercing in London
In the vibrant, style-conscious landscape of London, the curated ear has become a definitive statement of personal style. It’s an art form where jewellery and anatomy work in harmony to create a look that is uniquely you. At the very heart of this trend lies its most versatile and iconic component: the helix piercing. From a single, delicate stud to an ornate chain of interlocking rings, the helix piercing offers a universe of aesthetic possibilities.1 It’s no wonder that getting a helix piercing London has become a modern rite of passage for the fashion-forward.
But beyond its beauty and versatility, a helix piercing is a commitment. It’s a piercing through cartilage, which requires a level of skill, precision, and aftercare far beyond that of a simple lobe piercing. Navigating the process can feel overwhelming. What style should you choose? What does the procedure involve? How much will it hurt, and how do you ensure it heals perfectly?
This is your ultimate guide. We have poured our years of professional experience into this comprehensive resource to demystify the entire process. We will cover everything from understanding your own anatomy and the different types of helix piercings, to the critical details of the procedure, pain management, the complete healing journey, and choosing the perfect jewellery. Our goal is to empower you with the knowledge to make confident, informed decisions and ensure your experience of getting a helix piercing London is safe, positive, and results in a beautiful, lifelong piece of art.

helix piercing
Understanding the Helix: More Than Just One Piercing
Before you can choose your jewellery, you need to understand the canvas. The helix is not just one specific spot; it’s a whole region of your ear, offering a landscape of creative potential.
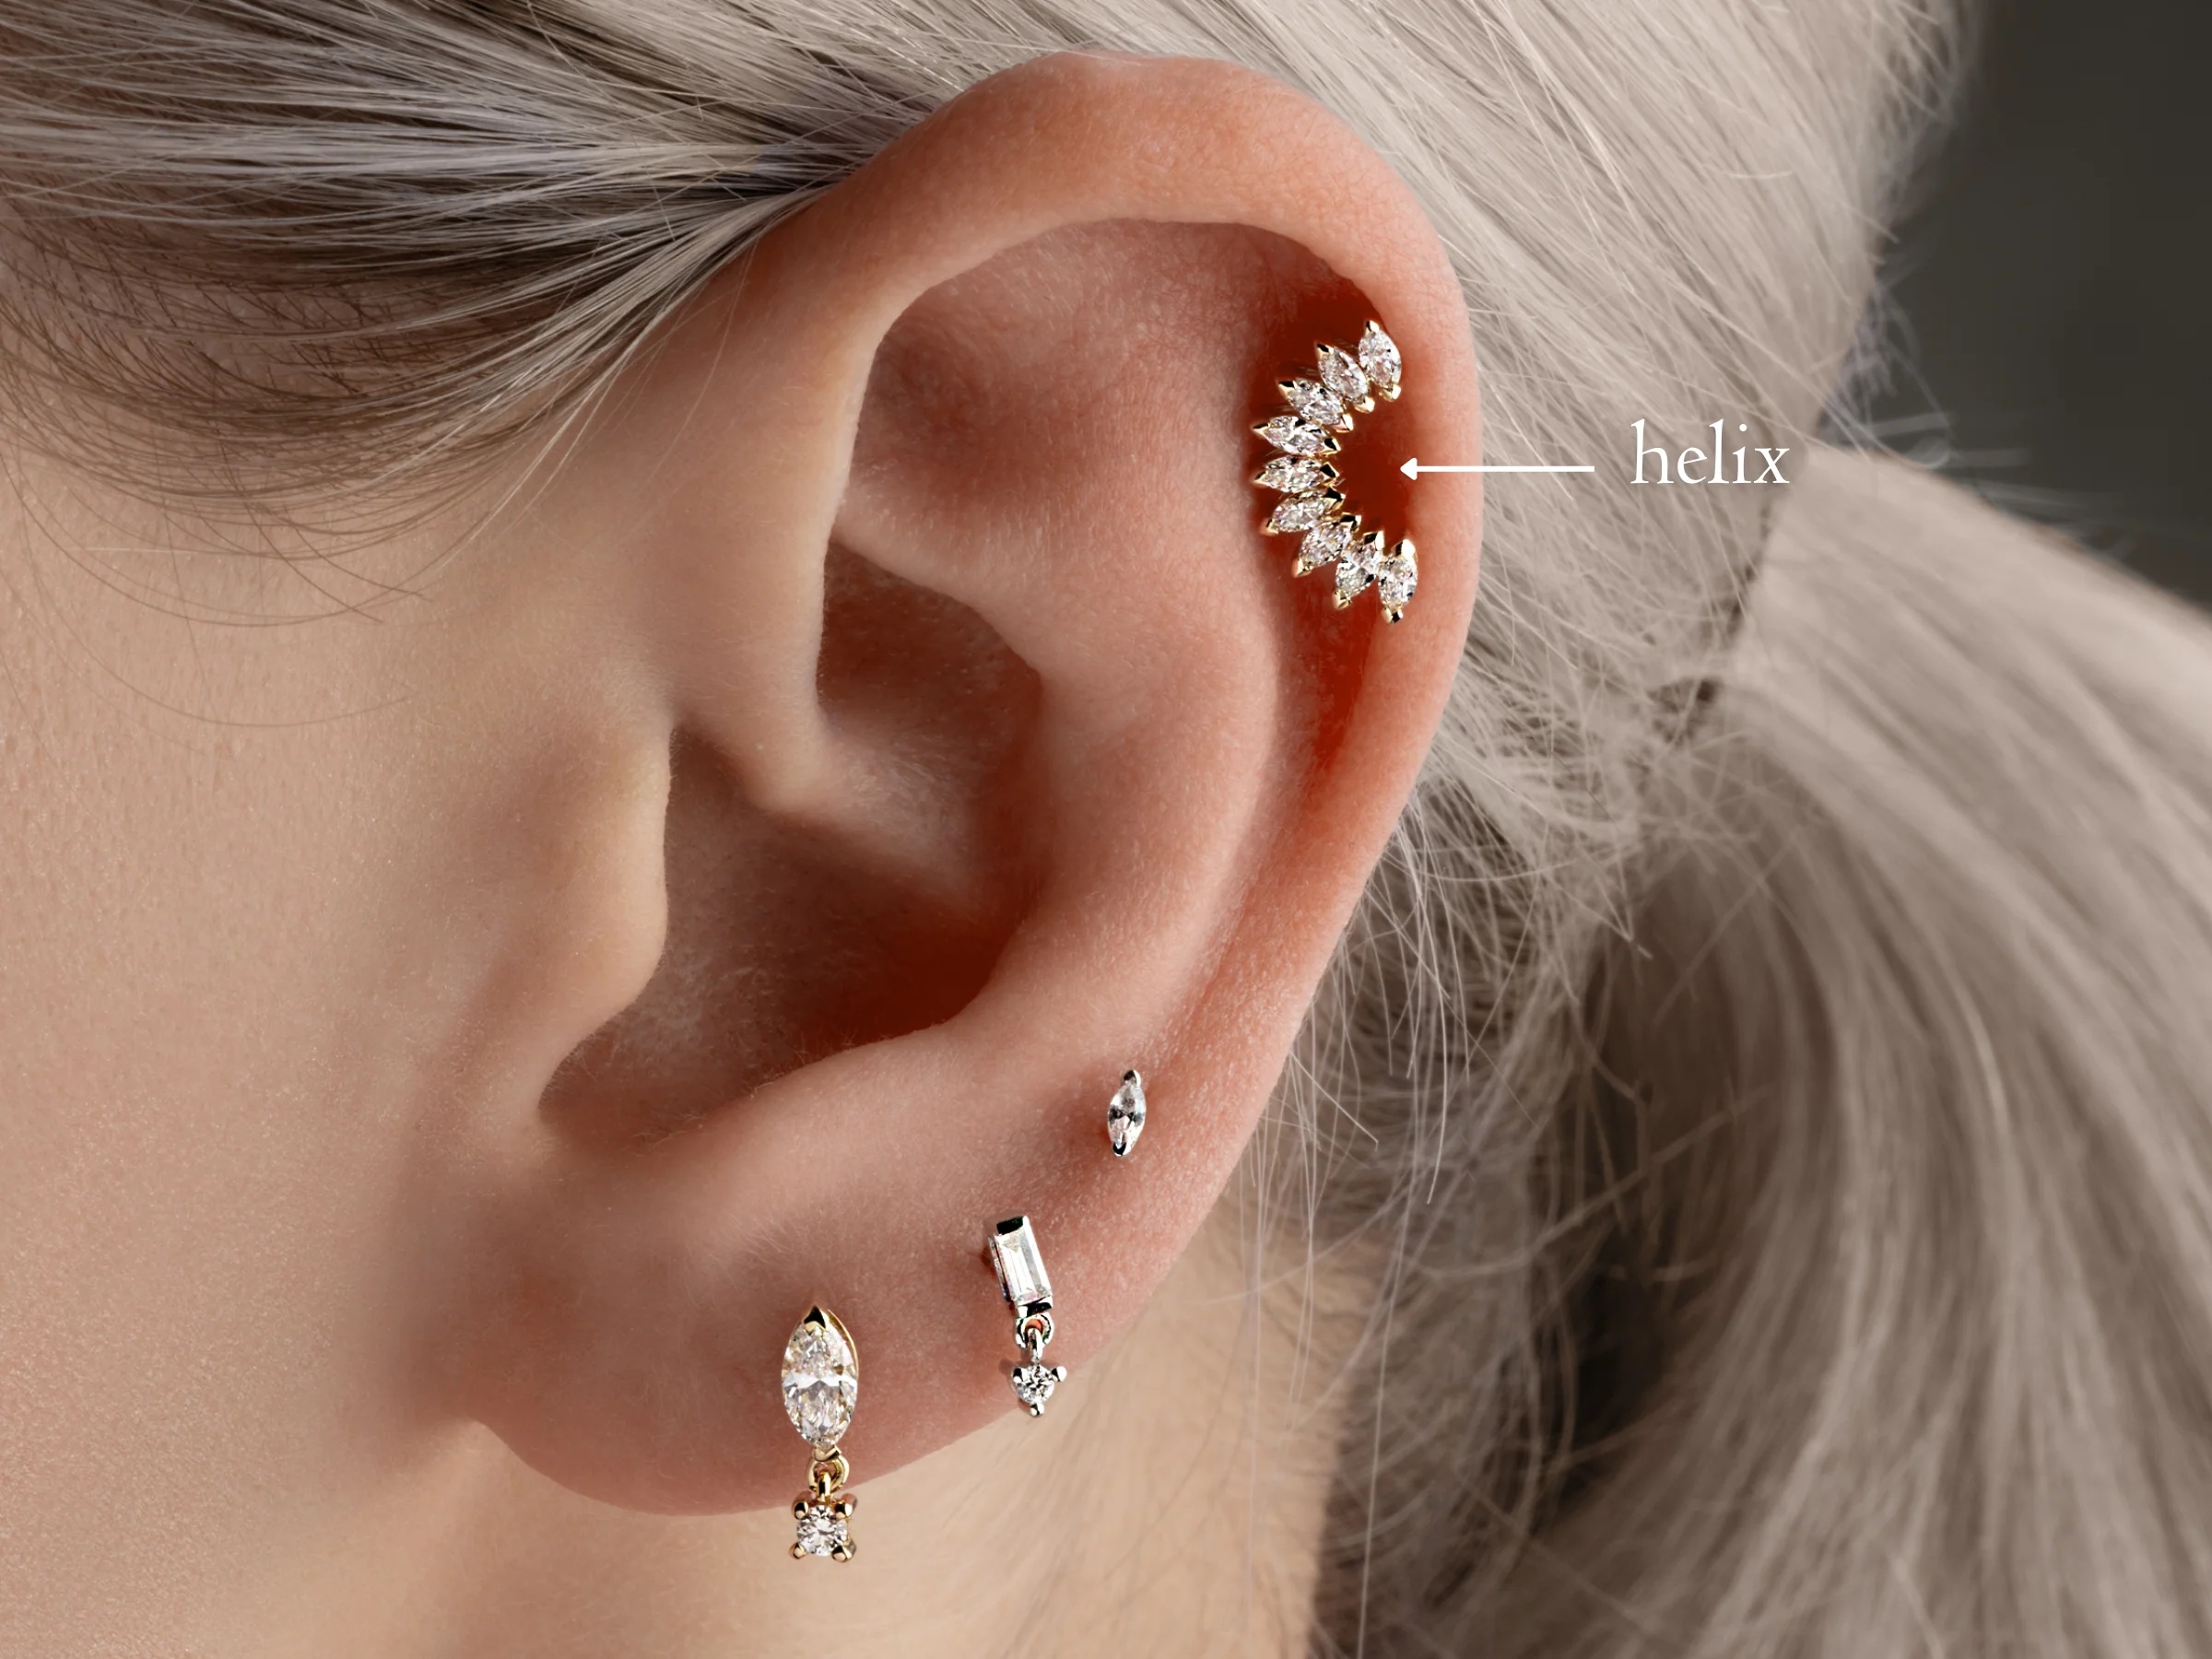
What is a Helix Piercing? The Anatomical Basics
Anatomically, the helix is the prominent outer rim of cartilage that curves around the top and side of your ear, from just above the lobe to where the ear meets the side of your head. It’s a graceful curve of cartilage that provides the perfect frame for adornment. Because it’s a large area with a defined shape, it allows for a wide variety of placements and combinations, making it the cornerstone of most ear curation projects.2 A well-placed helix piercing London can either be a subtle accent or the dramatic centrepiece of your entire ear styling.
A Spectrum of Styles: Types of Helix Piercings
The term “helix piercing” is an umbrella that covers several distinct placements.3 Understanding these variations is the first step in designing your unique look.
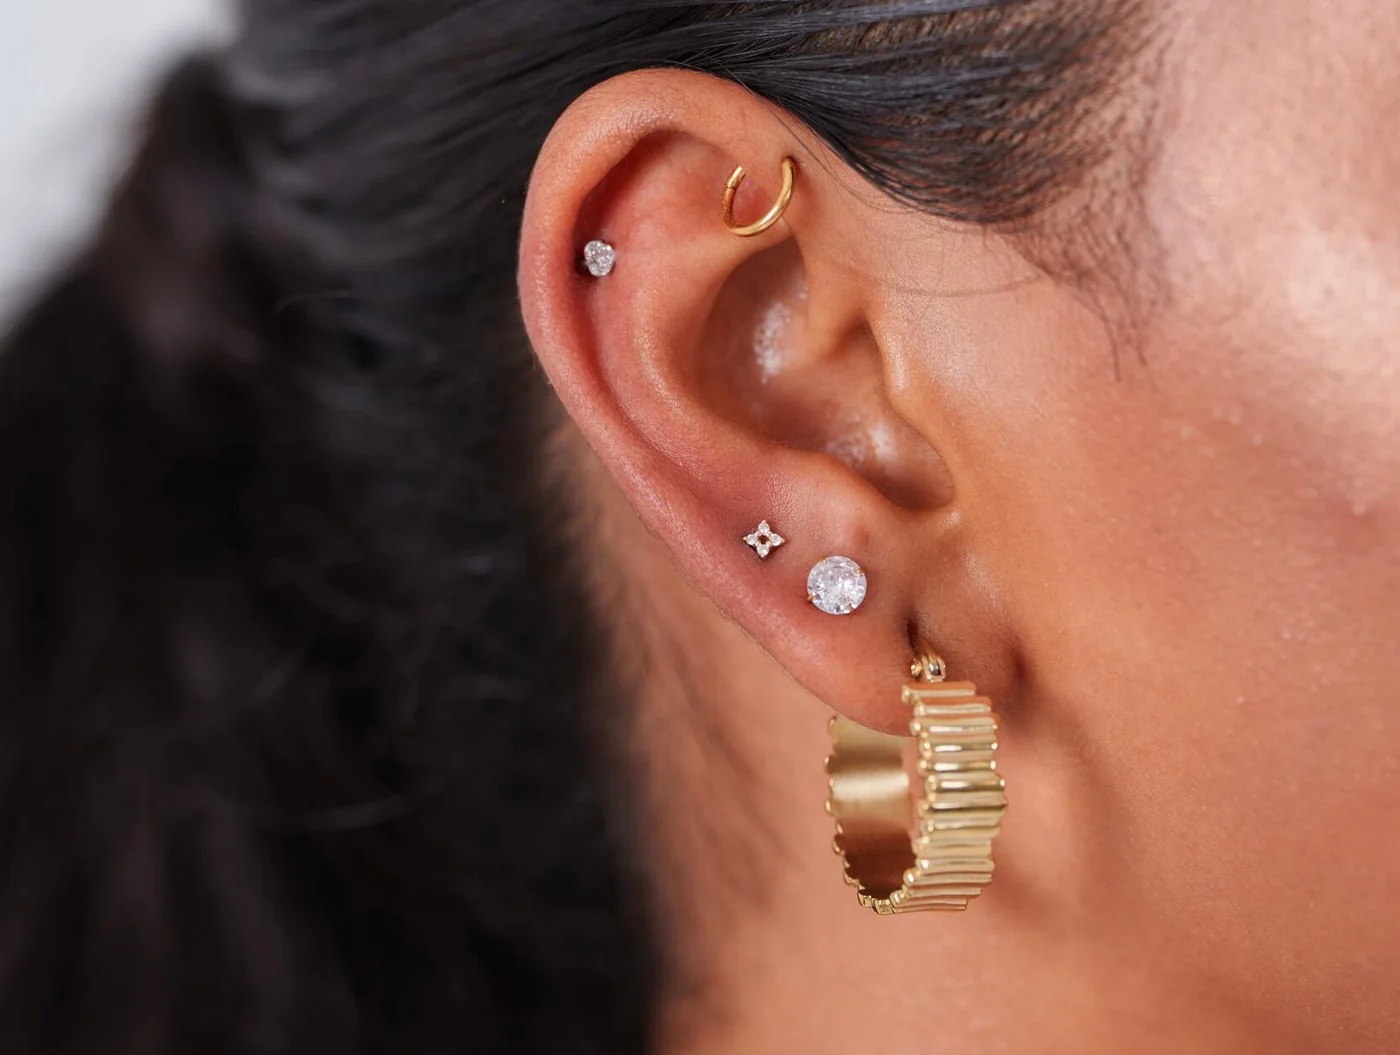
- The Standard Helix: This is the classic placement and what most people think of when they hear the term.4 It is located on the upper-outer portion of the cartilage rim. It can be a single piercing, but it is also incredibly popular to get a double helix or triple helix, where two or three piercings are stacked closely together along that curve.5
- The Forward Helix: This piercing is located on the forward-facing root of the helix—the small ledge of cartilage where the top of your ear meets your face, just above the tragus.6 The forward helix is a more unique and subtle placement that has gained immense popularity. It’s very common to see this done as a double or even a triple forward helix, creating a beautiful constellation effect.
- The Helix Orbital: An orbital is not a placement, but a style of jewellery. A helix orbital consists of two separate piercing channels on the helix rim that are connected by a single ring. This creates the illusion of the ring “orbiting” the cartilage. It’s a visually striking option that requires precise placement by a skilled piercer to ensure the two holes align perfectly for the ring to sit without pressure.
- The Anti-Helix (or Snug Piercing): While sometimes confused with the helix, the anti-helix is a separate ridge of cartilage located inside the main outer rim.7 A piercing through this ridge is called a snug. It’s a more advanced and anatomy-dependent piercing with a longer healing time, but it offers a unique and dramatic look.
How Your Unique Anatomy Affects Your Helix Piercing
This is a critical point that separates a professional studio from a low-quality one: not every ear is suitable for every piercing. Your unique anatomy will determine the ideal placement and viability of the helix piercing you desire.
- For a standard helix, you need a well-defined and reasonably pronounced outer cartilage ridge. If this ridge is very thin or curls over too tightly, it can be challenging to pierce and heal.
- For a forward helix, you must have a flat, defined ledge of cartilage at the front. Some people have a very soft or tiny root in this area, which may not be able to support the jewellery.
- For an industrial piercing (which is essentially two helix piercings connected by a long bar), you need to have two pronounced points on the helix ridge that can align perfectly without the bar pressing against the flat of your ear.
A truly professional piercer will always begin with an anatomical assessment. They will be honest with you about what is and isn’t possible for your ear. This isn’t about limiting you; it’s about setting you up for a successful, healthy, and beautiful piercing. This is a non-negotiable part of the service at any top-rated piercing studio in London.
The Procedure: What to Expect When Getting Your Helix Piercing in London
Knowing exactly what will happen during your appointment can significantly reduce anxiety and help you feel in control of the experience. A professional procedure is a calm, meticulous, and transparent process.
Choosing the Right Studio and Piercer
Your experience and the final result are almost entirely dependent on the skill of your piercer. When searching for the best artist for a helix piercing London, you should be looking for a studio with an unwavering commitment to hygiene and a piercer with a strong, diverse portfolio. Look for clear photos of healed helix piercings, as this is the true test of their skill. A perfectly straight, well-healed helix with appropriate jewellery is the mark of a true professional.
helix piercing
The Step-by-Step Piercing Process
- The Consultation and Jewellery Selection: Your appointment will begin with a conversation. You’ll discuss your desired placement and work with the piercer to choose the perfect piece of initial jewellery from our collection of implant-grade, body-safe materials.
- The Prep and Marking: You’ll be taken to a private, clinical-grade procedure room. The piercer will thoroughly disinfect the area of your ear to be pierced. They will then use a sterile, single-use skin marker to place a small dot indicating the exact placement. This is a collaborative step. They will show you the mark in a mirror, and the procedure will not proceed until you are 100% happy with the placement.
- The Pierce: Once you have approved the mark, the piercer will use a brand new, single-use, hollow needle that has been pre-sterilised. The piercing itself is a quick, smooth, and precise motion. You will feel a sharp pinch, but it is over in a second.
- The Jewellery Insertion: Immediately after the needle passes through, the piercer will insert your chosen jewellery into the new channel, often using a sterile taper pin to guide it in smoothly and without trauma. They will then secure the jewellery, and the piercing process is complete. The area will then be cleaned one final time.
Needles vs. Guns: A Critical Safety Warning for Cartilage
Let us be unequivocally clear: a piercing gun should never be used for any piercing, but it is especially catastrophic for cartilage like the helix. A piercing gun is not a precision tool; it is a blunt force instrument.8
- Trauma: A piercing needle is razor-sharp and hollow, cleanly parting the tissue to create a channel.9 A piercing gun uses blunt force to ram a stud through your cartilage.10 This shatters the cartilage, causes massive trauma, leads to excessive swelling, and can permanently disfigure your ear.
- Sterilisation: A piercing gun is made of plastic and cannot be properly sterilised in an autoclave. Wiping it with an alcohol swab does not kill all bloodborne pathogens. This poses a significant risk of transmitting diseases.
- Jewellery Quality: The studs used in piercing guns are low-quality, externally threaded, and often contain nickel. The “butterfly back” design traps bacteria and is completely inappropriate for healing.11
Any establishment that offers to pierce your cartilage with a gun is not a professional studio. A core reason clients seek out a reputable studio for their helix piercing London is to ensure this dangerous practice is avoided.
Pain, Healing, and Aftercare: The Helix Journey
The helix piercing journey doesn’t end when you leave the studio. In fact, the most important part has just begun. Proper aftercare and a lot of patience are essential for a successful heal.
The Pain Factor: An Honest Assessment
This is often the first question people ask. On a scale of 1 to 10, most people rate the pain of a helix piercing at around a 4-6/10.12 The sensation is a sharp, quick pinch during the piercing itself, which then subsides to a dull, warm, throbbing ache for a few hours afterwards. The skill of your piercer plays a huge role; an expert piercer using a sharp needle will be significantly less painful than an inexperienced one.
The Helix Healing Timeline: A Month-by-Month Guide
Cartilage has a much lower blood supply than fleshy tissue like the earlobe, which means the healing process is significantly longer.13 A helix piercing takes, on average, 6 to 12 months to fully and truly heal on the inside.
- Month 1 (The Inflammatory Phase): For the first few weeks, your piercing will be red, swollen, and tender to the touch. It may secrete a clear or yellowish fluid called plasma, which is normal. Your job during this phase is to keep it clean and avoid any and all trauma.
- Months 2-4 (The Granulation & Downsize Phase): The initial swelling should have subsided significantly. The piercing will feel less tender, but it is still very much a work in progress. You will notice “crusties” (dried plasma) forming around the jewellery, which is a normal part of healing.14 The most important event during this period is your downsize appointment. The initial piercing is done with a longer bar to accommodate swelling. Once the swelling is gone, this longer bar needs to be replaced by your piercer with a perfectly fitted, shorter one. This is CRITICAL for a helix, as the long bar is easily snagged, which can cause severe irritation and can even permanently alter the angle of the piercing.
- Months 5-12+ (The Maturation Phase): By this point, your piercing will likely look and feel healed from the outside. However, the internal channel of tissue (fistula) is still strengthening and maturing. It can still be sensitive to bumps or sleeping on it, and it can still flare up if irritated. You should not change the jewellery yourself for fashion purposes until it has been at least 6-9 months, and ideally after a final check-up with your piercer. Being patient during the long healing time for a helix piercing London is the key to a happy, healthy piercing.
The Ultimate Helix Aftercare Routine
- DO clean your piercing 1-2 times a day with a sterile saline solution spray.
- DO pat the area dry with a clean paper towel or use a hairdryer on a low, cool setting. Moisture is not your friend.
- DO use a travel pillow to sleep on, placing your ear in the hole to avoid any pressure on the piercing.
- DON’T touch, twist, or fiddle with your jewellery.
- DON’T use harsh chemicals like alcohol, peroxide, tea tree oil, or antibacterial ointments. These are far too aggressive and will delay healing.
- DON’T sleep on the piercing. This is the number one cause of healing problems.
- DON’T submerge the piercing in bodies of water (baths, swimming pools, oceans) until it is fully healed.
helix piercing
Troubleshooting Common Helix Problems
- Irritation Bumps: These are the most common issue with helix piercings. They are small, fluid-filled bumps that appear next to the piercing and are caused by irritation—snagging, sleeping on it, moisture, or low-quality jewellery. They are NOT infections. The key to getting rid of them is to identify and eliminate the source of the irritation and to continue with your sterile saline cleaning.
- Signs of Infection vs. Irritation: It’s vital to know the difference.
- Irritation: Tenderness, slight redness, clear or yellowish “crusties,” a fluid bump.
- Infection: Intense, radiating pain; thick, green, or dark yellow pus; a hot feeling to the touch; and potentially a fever. If you suspect an infection, contact your piercer and see a medical professional immediately.
Jewellery for Your Helix Piercing: A Guide to Style and Safety
Choosing the right jewellery is crucial for both the healing process and the final aesthetic of your piercing.
Initial Jewellery: Labret Studs vs. Rings
For an initial helix piercing London, we will almost always recommend a flat-back labret stud. The reasons for this are purely based on healing science:
- Stability: A stud moves far less than a ring, causing minimal irritation to the fragile healing channel.
- Reduced Snagging: The low-profile design is less likely to get caught on hair, clothing, or glasses.
- Promotes a Straight Heal: A stud ensures the fistula heals in a perfectly straight line.
Starting with a ring, while aesthetically pleasing, is highly risky for a helix. The curvature and constant movement of a ring put pressure on the piercing, significantly increasing the likelihood of developing stubborn irritation bumps and causing the piercing to heal at an odd angle. The beautiful, snug-fitting ring is your reward for a patient and successful heal.
Material Matters: Implant-Grade Only
As we’ve discussed, the material of your jewellery is non-negotiable. We only use certified, implant-grade materials for initial piercings to eliminate the risk of allergic reactions and ensure a smooth healing process. This includes:
- Implant-Grade Titanium (ASTM F-136)18
- Solid 14k or 18k Nickel-Free Gold
- Niobium
Styling Your Healed Helix Piercing
Once your piercing is fully mature (after 6-12 months), a world of styling options opens up. This is where the fun really begins! You can switch your simple initial stud for:
- Decorative Studs: Choose from an endless variety of intricate ends featuring genuine gemstones, opals, or unique gold designs.
- Rings: A perfectly healed helix can be adorned with a snug-fitting seam ring, a decorative clicker, or a beautiful orbital ring.19
- Chains: A very popular modern trend is to connect multiple helix piercings (or a helix and a lobe piercing) with delicate, draping chains, creating a truly bespoke and elegant look.20
Frequently Asked Questions (FAQ)
1. Can I get a helix piercing on both ears at the same time?
We strongly advise against this. You need one ear to sleep on. Since sleeping on a healing helix is the primary cause of complications, piercing both sides at once makes a successful heal almost impossible. It’s best to pierce one side, let it heal completely, and then do the other.
2. How long until I can sleep on my helix piercing?
You should avoid sleeping directly on your helix for the entire healing period, which can be up to a year. A travel pillow (the U-shaped kind) is your best friend—you can place your ear in the hole, allowing you to sleep on that side without putting any pressure on the piercing.21
3. My friend got their helix pierced with a gun and it was fine. Why is it so bad?
Your friend was lucky. Using a gun on cartilage is like trying to put a nail in a wall with a sledgehammer instead of a drill. It causes blunt force trauma, shatters the cartilage, and carries a huge risk of infection and permanent scarring.22 The “it was fine for me” argument doesn’t negate the enormous risks involved. A professional needle piercing is safer, less painful, and heals better every single time.23
4. What is the average cost for a high-quality helix piercing in London?
The cost can vary, but at a reputable studio, you should expect to pay a service fee plus the cost of the jewellery. The service fee for a helix piercing London typically ranges from £30-£50.24 The jewellery cost can range from £30 for a basic implant-grade titanium stud to several hundred pounds for a solid gold piece with genuine diamonds. Remember, you are paying for the piercer’s skill, the sterile environment, and the high-quality, safe jewellery.
5. Can I wear headphones or a helmet with a new helix piercing?
You should avoid anything that puts pressure on or introduces bacteria to the new piercing. Over-ear headphones that don’t touch the helix are usually fine. Earbuds can be problematic if they are close to the piercing site. Helmets (bicycle, motorcycle) must be put on and taken off with extreme care to avoid snagging. If your job or lifestyle requires constant helmet use, you should discuss this with your piercer during the consultation.

helix piercing
Conclusion: Your Journey to a Perfect Helix
The helix piercing is a timeless, beautiful, and incredibly versatile form of self-expression. It is the foundation of so many stunning ear curation projects and a perfect way to express your personal style. While it requires more patience and diligence than a simple lobe piercing, the results are more than worth it.
A successful helix piercing London is a partnership. It requires a skilled, knowledgeable piercer who prioritises your health and safety, and it requires a committed client who follows aftercare instructions diligently.25 By choosing a professional studio, trusting in the process, and giving your body the time it needs to heal, you are ensuring your new piercing will be a source of pride and beauty for a lifetime.