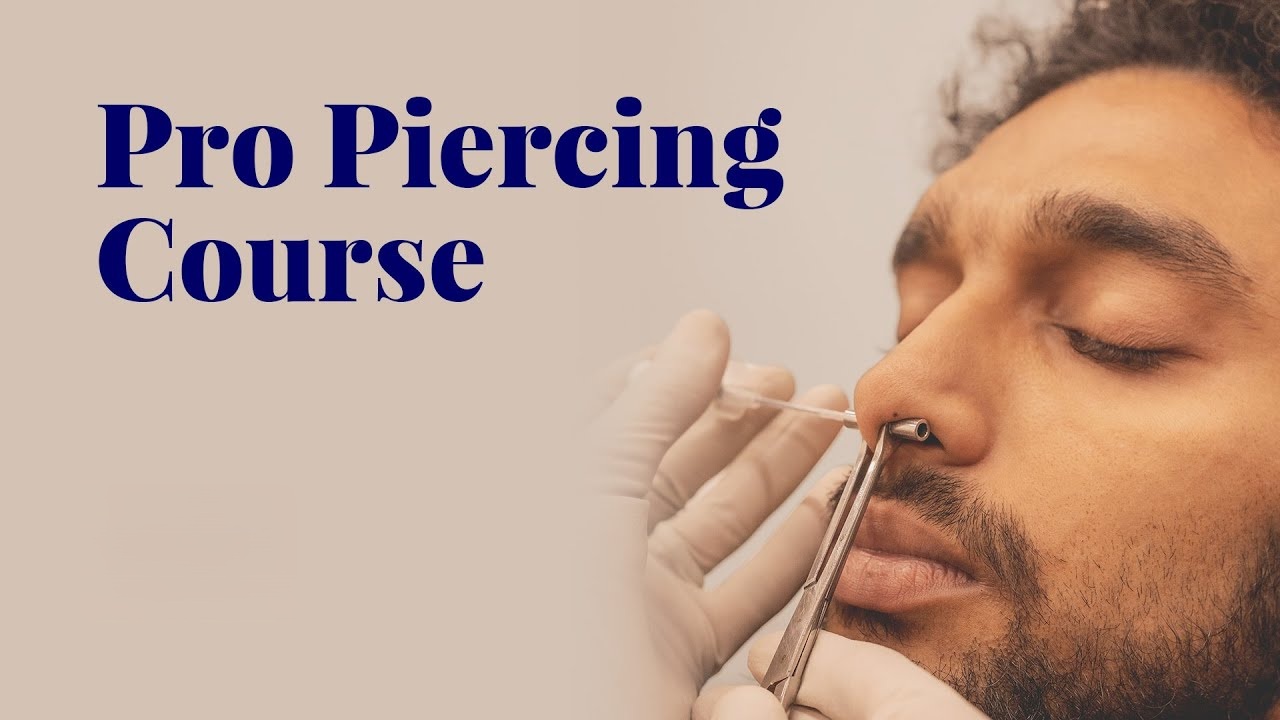
Gone are the days when body piercing was relegated to dark backrooms, questionable hygiene, and the traumatic blunt-force impact of a piercing gun in a shopping mall kiosk. We have entered a new era in London—a sophisticated age of “Curated Ears,” High-Fidelity Anatomy, and Luxury Adornment. Today, piercing is no longer just an act of rebellion; it is a refined discipline that sits at the precise intersection of medical-grade sterility and high-end fashion.
In the bustling streets of London—from the artistic hubs of Shoreditch to the luxury corridors of Mayfair—clients have evolved. They are no longer looking for a simple hole in their lobe. They are seeking an “Ear Project.” They demand to know if your jewelry is Implant Grade Titanium (ASTM F-136) or cheap nickel-laden steel. They ask about “downsizing timelines” and “angle migration.” The modern client is educated, discerning, and willing to pay a premium for safety and style.
piercing training course
But here lies the gap in the industry: While the demand for luxury piercing has skyrocketed, the number of truly qualified, clinically trained professionals has not kept pace.
At PinkTatPier Academy, we do not teach you how to “poke holes.” Anyone can push a needle through skin. We teach you Body Architecture. We teach you to understand the vascularity of the septum, the precise cartilage density of the rook, and the crucial geometry required to ensure a piercing heals perpendicular to the tissue, avoiding the dreaded “migration drift.”
This comprehensive masterclass is your bridge from being an outsider to becoming an Industry Insider. Whether you are a tattoo artist looking to double your revenue through jewelry upselling, or a complete beginner seeking a career that offers both artistic freedom and financial stability, this curriculum is the “Gold Standard.”
Over the next 6,000 words, we will dismantle the myths of the industry. We will dive deep into Aseptic Technique that rivals hospital operating rooms. We will explore the physics of Cannula vs. Blade needles. We will unlock the psychology of client management and the lucrative business of Jewelry Curation.
You are not just learning a trade; you are inheriting a legacy of safety, art, and excellence. Welcome to PinkTatPier. Let’s verify your sterile field.
piercing training course
ChThe Modern Piercer (Opportunity)
The Renaissance of Body Art: From Mall Kiosks to High-End Aesthetics
Welcome to the PinkTatPier Academy.
If you are reading this, you have already taken the first step toward a career that sits at the precise intersection of medical discipline, artistic expression, and lucrative business strategy. You are not here to learn how to poke holes in people. You are here to learn the profession of Body Piercing as it exists today in the high-standards jurisdiction of London and the UK.
The industry has shifted. We have moved away from the stereotype of the dark, intimidating tattoo parlour in a back alley. Today, body piercing is a luxury service. It is performed in clinical, boutique environments that resemble high-end medical spas more than the grunge studios of the 1990s.
In this first module, we will deconstruct why this shift has happened, why the “piercing gun” is an archaic tool of the past, and exactly how the modern professional piercer builds a recession-proof career.
1. The “Gun” vs. The Needle: A Clinical Ultimatum
Let us address the single most important distinction in our industry immediately. At PinkTatPier, and indeed at any reputable studio in the UK, we never, under any circumstances, use a piercing gun.
To the uneducated public, the “gun” (or mechanical stud device) seems faster and less scary. As a professional, you must understand the pathology of why the gun is dangerous, unethical, and arguably negligent.
The Physics of Blunt Force Trauma
A piercing gun operates on a spring-loaded mechanism. It takes a jewelry stud—which is essentially a blunt object—and forces it through the tissue at high speed.
The Paper Analogy: Imagine holding a sharp scalpel to a tight sheet of paper. It glides through, separating the fibers cleanly. Now, imagine taking a sharpened pencil and jamming it through that same paper. It tears, rips, and explodes the fibers outward.
The Result: When a gun is used on cartilage (the upper ear), the blunt force often shatters the cartilage plate. This causes “cauliflower ear,” permanent structural collapse, and hypertrophic scarring. On the lobe, it causes excessive trauma and swelling, delaying healing by weeks.
The Sterilization Impossibility
This is a matter of microbiology. Standard piercing guns are made of plastic and metal components. To sterilize a tool for medical use, it must be put into an autoclave—a machine that uses high-pressure steam at 134°C to kill all bacteria, viruses, and spores.
The Failure: You cannot autoclave a plastic piercing gun; it will melt.
The Risk: Most gun operators wipe the device with an alcohol swab between clients. Alcohol does not kill bloodborne pathogens like Hepatitis B, Hepatitis C, or HIV. When the gun’s spring fires, microscopic particles of blood and tissue fluid are aerosolized (sprayed) onto the inner workings of the gun. These particles can remain viable for days and be transferred to the next client.
The PinkTatPier Standard: We use single-use, medical-grade, tri-beveled hollow needles. They are laser-sharp. They do not “crush” tissue; they create a clean, crescent-shaped incision that allows room for the jewelry to sit without pressure. It is painless, sterile, and heals significantly faster.
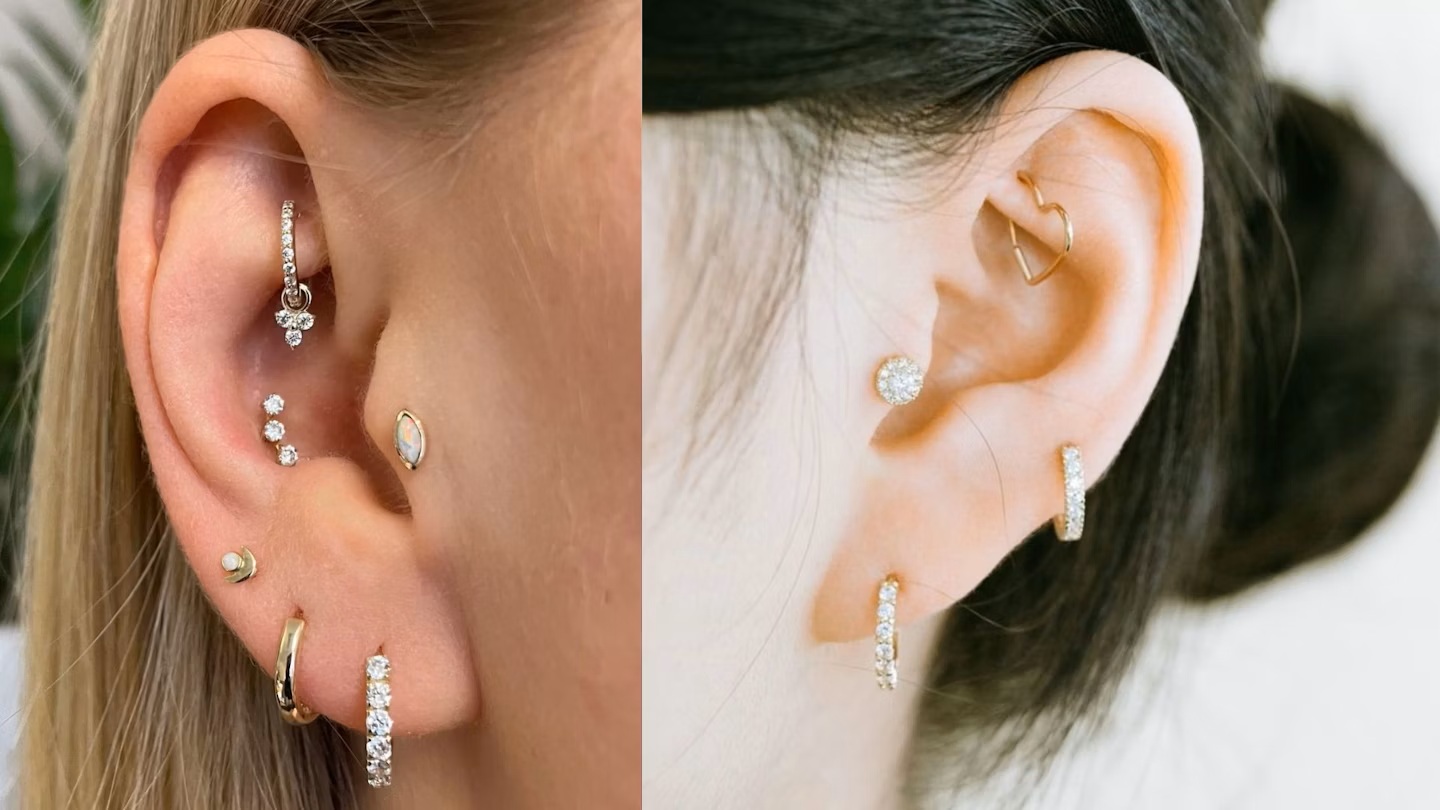
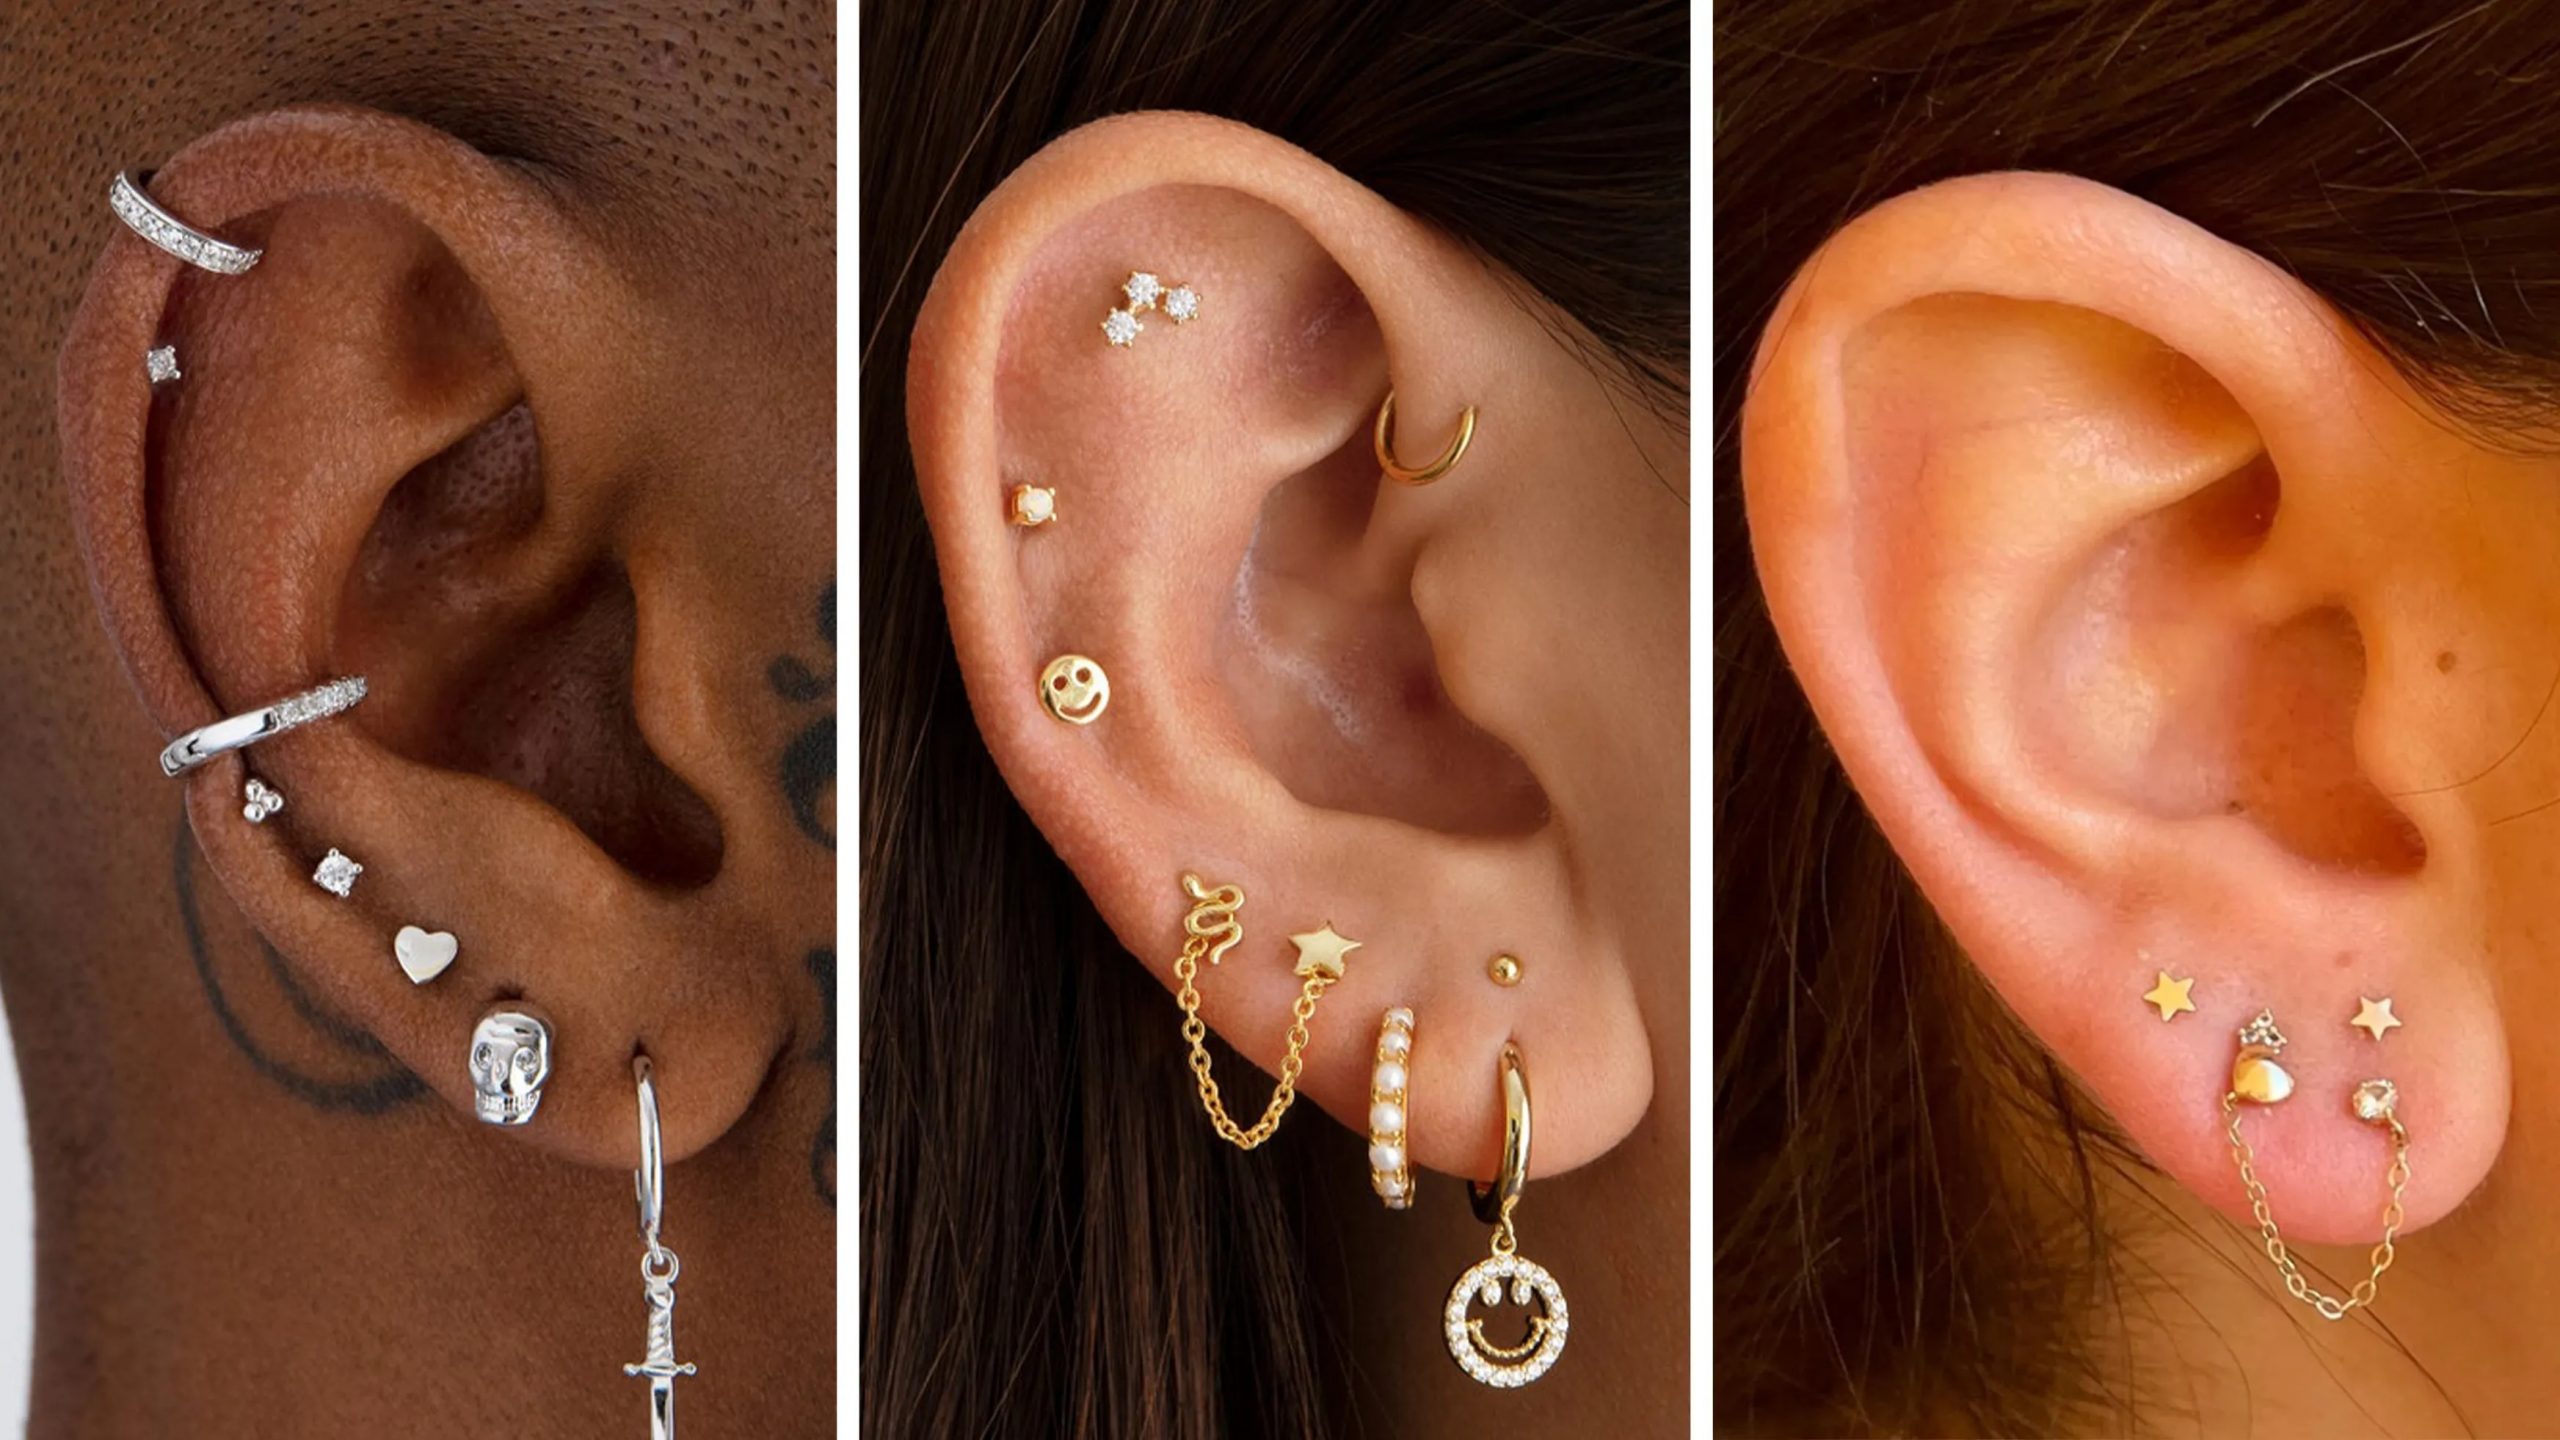
2. The Rise of the “Curated Ear” & Luxury Piercing
Why is now the time to enter this industry? Because the market value of a single client has skyrocketed.
Ten years ago, a client might come in for a single helix piercing with a standard surgical steel ring, costing £20. Today, influenced by high-fashion trends and the London “Curated Ear” movement, clients are not buying a “hole”—they are buying a styling experience.
The “Curated” Phenomenon
Clients now seek “Constellation Piercings”—a specifically designed arrangement of piercings that complement their unique anatomy. They want:
Daith and Rook combinations for balance.
Stacked Lobes for visual weight.
Forward Helix trios for delicate detailing.
This shift has moved piercing from a rebellious act to a fashion statement akin to buying a designer handbag. The clientele has changed from rebellious teenagers to professionals, lawyers, and fashion enthusiasts who demand gold, diamonds, and genuine gemstones.
The Environment
To cater to this clientele, the “Modern Studio” must reflect clinical excellence.
Lighting: Bright, clinical daylight LEDs (essential for precision).
Aesthetics: Clean lines, marble counters, gold accents, and visible sterilization equipment.
Atmosphere: Reassuring and calm. Many clients are nervous; your studio must be a sanctuary, not a dungeon.
3. The Economics of Piercing: Turnover & Margins
Body piercing is one of the few recession-proof industries. People may stop buying houses, but they rarely stop treating themselves to affordable luxuries like body jewelry.
The Business Model
The financial structure of a professional piercer is two-fold: Service Fees and Jewelry Sales.
The Service (The Time): A piercing procedure, once you are proficient, takes approximately 15 to 20 minutes from greeting to goodbye. The actual needle-work takes seconds. A setup fee covers your disposables (needles, gloves, gauze) and your time.
The Jewelry (The Profit): This is the secret to the modern piercer’s income.
Old Model: Use cheap steel jewelry included in the price.
PinkTatPier Model: The piercing fee is separate. The client then purchases their jewelry.
The Upsell: When a client sees a display of implant-grade titanium, 14k Gold, and Swarovski crystals, they rarely choose the basic option. The markup on high-end body jewelry is significant, often ranging from 300% to 500%.
Example Scenario:
Piercing Fee: £35 (Covers 20 mins of time + £5 cost of sterile setup).
Jewelry Sale: Client chooses a 14k Gold Labret attachment with an Opal stone. Wholesale cost: £25. Retail price: £85.
Total Revenue: £120 for 20 minutes of work.
Efficiency: A busy piercer can safely perform 2-3 procedures an hour. Do the math.
piercing training course
4. The Career Path: From Apprentice to Senior Stylist
Becoming a Lead Senior Piercer at a studio like PinkTatPier London is a journey of respect for the craft. You cannot fast-track safety.
Phase 1: The Apprentice (The “Shop Kid”)
Duration: 6–12 Months.
Focus: Hygiene and Observation. You will clean floors, scrub tubes, run the autoclave, and learn the names of every tool. You will not touch a needle. You are learning microbiology before you learn modification.
Goal: To understand that a sterile field is the most important part of the job.
Phase 2: The Junior Piercer
Duration: 1–2 Years.
Focus: The Basics. Lobes, simple Helix, maybe a Nostril. You are supervised constantly. You focus on perfecting the “perfect perpendicular angle” (which we will cover in Chapter 3).
Goal: Consistency. Developing muscle memory and “bedside manner.”
Phase 3: The Senior Piercer & Stylist
Duration: 3+ Years.
Focus: Complex anatomy (Industrial, Daith, Surface Anchors, Genitals) and High-End Styling. You are no longer just piercing; you are advising clients on jewelry that suits their skin tone and ear shape.
Role: You handle difficult heals, manage inventory, and mentor apprentices. You are an expert in cross-contamination prevention.
Medical Hygiene & Legal Protocol
The Invisible Enemy: Microbiology, Law, and the Aseptic Field
Warning: This is the most critical chapter of your career.
You can be a brilliant artist with a needle. You can style the most beautiful “curated ear” in London. But if you lack a foundational understanding of microbiology and legal compliance, you are a liability. A bad piercing heals; a bloodborne disease changes a life forever.
At PinkTatPier, we do not view ourselves merely as decorators of the body, but as technicians of the skin barrier. When you pierce, you are intentionally breaching the body’s primary defense system against infection. This requires the same mindset as a minor surgical procedure.
1. Microbiology 101: What We Fight
As a piercer, you are constantly battling Pathogens—microorganisms that cause disease. You cannot see them, but you must assume they are present on every surface and every client. This assumption is the core of Universal Precautions: treat all blood and body fluid as if it is infectious.
The “Big Three” Bloodborne Pathogens
While bacterial infections (like Staph) are common annoyances, your primary safety protocols are designed to stop viruses that reside in the blood:
Hepatitis B (HBV): The greatest risk to piercers. HBV is incredibly resilient; it can survive in dried blood on a surface (like a piercing bench or tool) for up to 7 days. It is highly infectious—far more so than HIV. Requirement: All PinkTatPier staff must be vaccinated against Hepatitis B.
Hepatitis C (HCV): Another liver-attacking virus spread through blood-to-blood contact. There is no vaccine.
HIV (Human Immunodeficiency Virus): While the virus is fragile outside the body, the risk exists through needle-stick injuries.
Breaking the Chain of Infection
Cross-contamination is the transfer of bacteria/viruses from one person/object to another.
The Vector: You (the piercer) are the most likely vector. If you touch a client’s ear, then touch your trolley, then touch a clean gauze packet, you have contaminated the gauze.
The Solution: We utilize a strict “No-Touch” Technique or Aseptic Non-Touch Technique (ANTT). If an item is sterile, it can only be touched by sterile gloves. If an item is clean (disinfected), it can only be touched by clean exam gloves.
2. UK Legal Framework: The License to Operate
In the United Kingdom, you cannot simply buy a needle and open a shop. The industry is strictly regulated to protect public health.
The “Special Treatments” License
Under the London Local Authorities Act 1991 (and the Local Government (Miscellaneous Provisions) Act 1982 outside London), body piercing is classified as a “Special Treatment.”
Premises License: The studio itself must be inspected and licensed by the local council Environmental Health Officer (EHO). They check your floors (must be washable), your sinks (must be non-touch/elbow operated), and your waste contracts.
Practitioner License: You must be registered personally. You cannot pierce legally without your own license attached to the studio.
Age of Consent & The Law
This is a strict legal boundary. There are no “parental consent” loopholes for certain laws in the UK.
Lobe/Cartilage/Nostril: Usually 16+ without a parent, or 14+ with a parent (Council rules vary slightly, but this is the London standard).
Nipple Piercings: STRICTLY 18+. To pierce a nipple on a minor is effectively sexual assault/indecency under the law.
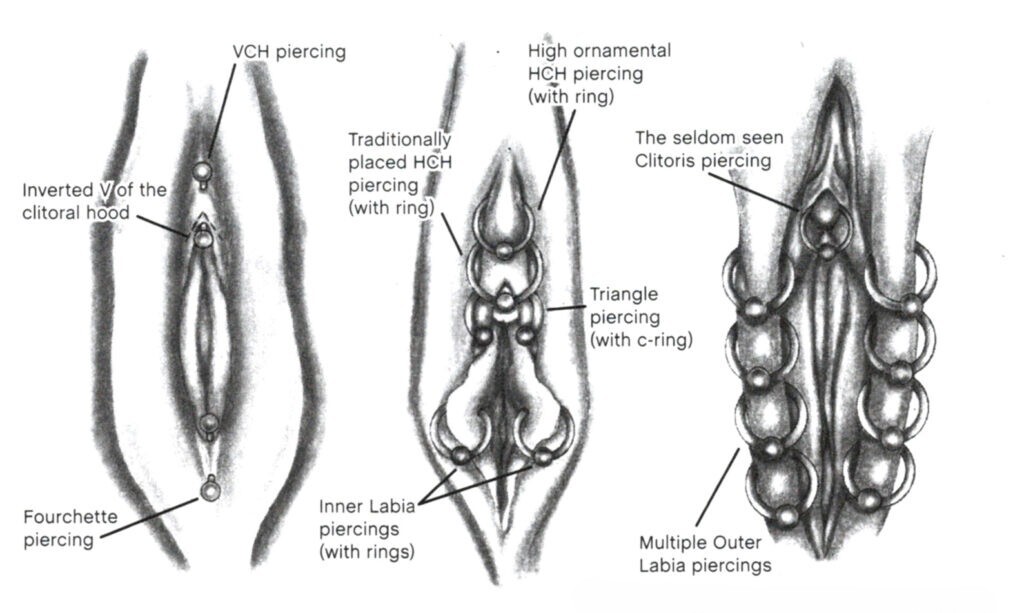
Genital Piercings: STRICTLY 18+. Even with parental consent, performing a genital piercing on a minor (under 18) is a criminal offense under the Protection of Children Act 1978 and constitutes Female Genital Mutilation (FGM) in females, a serious felony.
PinkTatPier Rule: We operate a “Challenge 25” policy. Valid photo ID (Passport/Driving License) is scanned and stored for every single client, regardless of apparent age.
3. The Sterilization Cycle: Autoclave Physics
Cleaning is not sterilizing.
Cleaning: Removing visible dirt/blood (Ultrasonic cleaner).
Disinfection: Killing most bacteria (Alcohol/Wipes).
Sterilization: Killing all microbial life, including spore-forming bacteria.
The Vacuum B-Class Autoclave
At PinkTatPier, we use only Vacuum (Class B) Autoclaves.
Unlike a simple pressure cooker (Class N), a Vacuum autoclave pumps all the air out of the chamber before blasting it with steam.
Why? Because air pockets insulate bacteria. If air remains inside a hollow piercing needle or tube, the steam cannot touch the surface, and the bacteria survive. The vacuum ensures the steam penetrates every hollow crevice.
The Cycle: 134°C for a minimum holding time (usually 3-4 minutes) at approx 2 bar pressure.
Verification: Every cycle is logged. Every pouch has a chemical indicator that changes colour (e.g., pink to black) to prove sterilization conditions were met.
piercing training course
4. Protocol: The Sterile Field Setup
When a client sits in your chair, you are performing a ritual. Every movement is choreographed to maintain the “Sterile Field.”
The Mayo Stand (Your Altar)
The Mayo stand (metal tray) is your zone of operations.
Disinfect: The tray is wiped with high-level disinfectant.
The Drape: A sterile dental bib is placed on top. This is the “Clean Field.”
The Drop: All pre-sterilized tools (needles, clamps, jewelry, gauze) are opened carefully and “dropped” onto the field without the outside of the packaging touching the bib.
Glove Protocol: The Donning & Doffing
You will use two types of gloves.
Examination Gloves (Nitrile): Clean, from the box. Used for setting up, cleaning the client’s skin, and marking the dot.
Rule: Once you touch the client’s skin, these gloves are “dirty.” Do not touch your clean equipment boxes.
Sterile Gloves: Packed in pairs, surgically sterilized.
Usage: These are donned ONLY after the skin is prepped and marked. Once you have sterile gloves on, you touch nothing but the sterile field and the piercing site. If you scratch your nose or adjust your chair, you have broken sterility and must start over.
Skin Preparation
You cannot sterilize skin (you would burn it), but you can significantly reduce the bio-load.
Step 1: Alcohol wipe to degrease (remove oils/makeup).
Step 2: Iodine or Chlorhexidine solution applied in a circular motion, moving from the center (piercing site) outward.
Wait Time: You must allow the solution to dry (approx 30 seconds). It is the drying action that kills the bacteria.
5. Waste Management: The Colours of Safety
After the procedure, the cleanup is hazardous. We segregate waste strictly to protect cleaner staff and the environment.
Yellow “Sharps” Bin: This is for Needles ONLY. The moment the needle leaves the skin, it goes immediately into the sharps bin. Never put a needle down on the tray. This prevents accidental stabs.
Orange Bags (Clinical Waste): Anything contaminated with blood or body fluids (gauze, gloves, cotton buds) goes here. It is incinerated by a specialist company.
Black/Clear Bags (General Waste): Packaging wrappers, paper towels used for hand drying. Non-hazardous only.
Anatomy & Angulation Physics
The Geometry of Flesh: Mapping the Terrain
Welcome to the Engineering Module.
To the amateur, a piercing is a hole. To the PinkTatPier professional, a piercing is a permanent surgical channel that must coexist with dynamic, moving tissue.
This chapter shifts your focus from microbiology to structural engineering. We are dealing with three physical forces: Tension, Pressure, and Gravity. If you ignore these, your beautiful piercing will not just fail—it will physically move across the client’s body (Migration) or be forcibly ejected by the immune system (Rejection).
1. The Physics of Angulation: The 90-Degree Rule
The single most common cause of “piercing bumps” (often misdiagnosed as keloids) is poor angulation.
The Perpendicular Principle
Every standard body piercing must be performed at a perfect 90-degree angle ($90^\circ$) to the tissue surface.
Why? Imagine a post passing through a wall. If it goes straight through, the pressure on the entrance and exit is equal. If it goes through at a slant (e.g., $75^\circ$), the jewelry will physically press against the “uphill” side of the tissue.
Pressure Necrosis: This constant mechanical pressure kills the cells on one side. The body responds by building scar tissue (the dreaded bump) or by eroding the tissue to relieve the pressure.
Relative “Straightness”
“Straight” does not mean straight relative to the floor. It means straight relative to the anatomy.
Example (The Navel): A navel piercing might look tilted when the client stands, but it must be perpendicular to the ridge of skin being pierced.
The “Drift”: If a needle is not supported correctly, the bevel (the slanted tip) can cause the needle to drift off-course as it passes through tough cartilage. You must learn to brace your hand to counteract this bevel drift.
2. Ear Anatomy: The Cartilage Map
The ear is not a single sheet of cartilage. It is a complex landscape of ridges, valleys, and varying tissue densities. You must know the names and properties of these structures.
The Primary Landmarks
The Lobe (Lobule):
Structure: Adipose (fatty) and areolar tissue. No cartilage.
Healing: Fast (6-8 weeks). High vascularity (blood flow) means quick regeneration.
Placement: Standard positioning is centered, but modern “Stacked Lobes” require careful vertical alignment.
The Helix & Scapha (The Rim & Flat):
Structure: The curled outer rim (Helix) and the flat depression inside it (Scapha).
Physics: The Helix curl can put pressure on jewelry backings. You must ensure there is room for the flat-back stud to sit flush without digging into the skull.
The Tragus:
Structure: The thick nub of cartilage covering the ear canal.
Risk: It is thick and crunchy. The needle requires more force.
Anatomy Check: Some clients have a tragus too small to support jewelry. If you pierce a tragus that is too small, the jewelry will migrate out, leaving a slit scar.
The Daith:
Structure: The innermost fold of cartilage (the crus of the helix) just above the ear canal.
Technical Difficulty: High. It is tucked away, making visibility poor.
The Myth: While anecdotal reports suggest it helps migraines, we never advertise this as a medical cure. We sell aesthetics, not acupuncture.
The Conch:
Structure: The deep “bowl” of the ear.
Vascularity: The conch often has visible small veins running through the cartilage. Do not pierce through a visible vein. This causes excessive bleeding and bruising. We use a “trans-illumination” technique (shining a light through the ear) to map these vessels.
The Industrial (Scaffold):
The Ultimate Geometry Test: Two holes connected by a single straight bar.
The Fail State: If the two holes are not perfectly aligned with each other ($180^\circ$ alignment), the bar will warp the ear. The resulting tension causes massive, painful bumps. Not every ear has the anatomy for this. If the scapha (flat) protrudes too much, the bar will dig into it.
3. Facial Anatomy: The “Sweet Spots” and Danger Zones
The face is highly vascular (prone to bleeding) and densely packed with nerves. Millimeters matter here.
The Septum “Sweet Spot”
A septum piercing should never go through the hard cartilage (the quadrangular cartilage). It is painful and heals poorly.
The Target: We aim for the “Alar Cartilage Membranous Tissue”. This is a tiny window of soft skin found below the hard septum cartilage but above the thick skin of the columella (the bottom of the nose).
Finding it: This is done by feel, using the “Septum Clamp” or freehand palpation. The needle should glide through like butter.
The Nostril
Placement: Placed in the “crease” or “groove” of the nostril wing.
Angle: It must be perpendicular to the curve of the nose. If pierced flat, the gem will point at the floor rather than outward.
The Lip & Oral Webbing
Vascularity Warning: The Superior and Inferior Labial Arteries run through the lips. While hitting a major artery is rare with standard placement, hitting smaller arterioles causes heavy bleeding.
The “Smiley” (Upper Frenulum): Piercing the thin web connecting the upper lip to the gum.
Warning: This tissue is paper-thin. Migration is almost guaranteed over time. Furthermore, the metal jewelry often rubs against the gum line, causing Gum Recession and Enamel Erosion. You must warn clients of this dental risk.
The Tongue
Anatomy: The tongue is two muscles (left and right) joined in the center.
The Danger: The Deep Lingual Arteries run parallel along the bottom of the tongue.
Protocol: We pierce the “median sulcus” (the center line) to go between the muscles and avoid the arteries. We also check the underside for the lingual frenulum (tongue web) to ensure we don’t pin the tongue down.
piercing training course
4. Neural & Vascular Danger Zones: Where NOT to Pierce
There are areas where the risk outweighs the aesthetic reward.
The “Snake Eyes” (Horizontal Tongue Piercing):
The issue: It binds the two muscles of the tongue together, inhibiting independent movement. It causes speech impediments (lisps) and severe dental damage.
PinkTatPier Policy: We refuse to perform this piercing. It is unsafe.
Finger/Hand Webs:
The issue: High movement, high bacteria contact, poor circulation. They almost always reject or get infected.
Cheeks (Dimples):
The issue: The Parotid Duct (salivary duct) runs through the cheek. Severing this can cause saliva to leak internally or create a permanent fistula that leaks saliva onto the face. This is an advanced piercing only to be attempted by masters of anatomy
The Tools of the Trade (Hardware)
Precision Engineering: Extensions of the Hand
Welcome to the Armoury.
A surgeon is only as good as their scalpel; a piercer is only as good as their needle. At PinkTatPier, we do not use “tools” in the crude sense. We use precision-engineered medical instruments designed to minimize trauma and maximize accuracy.
In this chapter, we will strip away the mystery of the piercing tray. You will learn why a 50p needle is vastly superior to a £100 piercing gun, and why the specific geometry of steel determines the pain level of your client.
1. The Needle: Physics of the Tri-Bevel
The standard sewing needle is conical—it pushes fibers apart. The hypodermic piercing needle is a cutting instrument.1
The Tri-Bevel Geometry
Our needles are not just sharp; they are “Tri-Beveled.” If you look at the tip under a microscope, you will see three distinct cutting edges:
The Primary Bevel: The main slice that initiates the incision.
The Secondary & Tertiary Bevels: Two side cuts that widen the incision into a crescent shape.
The “Crescent” Incision: This shape creates a flap of tissue rather than removing a core (biopsy). This flap acts as a natural bandage, pressing against the jewelry to seal the wound and prevent bleeding.
The Great Debate: Cannula vs. Blade
In the global piercing community, there are two distinct schools of thought. As a PinkTatPier professional, you must master both, though we lean heavily toward the Blade for advanced work.
A. The Cannula Needle (The “Catheter” Style)
Common in the UK and Europe, this is essentially a medical IV catheter. It consists of a needle inside a plastic tube (the cannula).
The Mechanism: You pierce through the skin. You slide the needle out, leaving the plastic tube in the hole. You then cut the end of the plastic tube and insert the jewelry into the tube. You pull the tube through, dragging the jewelry with it.
Pros: It is excellent for beginners. The plastic tube holds the channel open, guaranteeing you won’t “lose” the hole if the jewelry is tricky to insert. It is also safer for sharps disposal (the needle is sheathed immediately).
Cons: The “Step.” The plastic tube is slightly wider than the needle tip. As it passes through the skin, the client feels a secondary “pop” or drag. This causes slightly more trauma than a blade.
B. The Blade Needle (The “American” Style)
This is a hollow metal tube with no plastic sheath. It is the preferred tool of high-end luxury piercers.
The Mechanism: You pierce the skin. The needle remains in the body. You place the jewelry guide pin inside the back of the needle. You push the needle through, and the jewelry follows seamlessly.
The “Pin Transfer”: This requires high dexterity. There is no safety net. If you fumble the transfer, the hole closes instantly.
The “Clean” Feel: Because the needle is the same diameter as the jewelry (or slightly larger), there is zero drag. The client feels one sharp scratch, and it is over. It is surgical elegance.
2. Stabilization: Forceps, Clamps, and Receiver Tubes
You cannot pierce a moving target. To ensure that “Perfect Perpendicular Angle” (Chapter 3), we often need to stabilize the tissue.
Pennington Forceps
The workhorse of the industry. These are triangular-headed clamps with a slot in the middle.
Usage: You clamp the tissue (e.g., the ear lobe) so the dot is visible in the triangle window.
Design: The “slotted” design allows the needle to pass through the clamp without pinning the instrument to the client’s ear.
PinkTatPier Protocol: We use disposable, single-use plastic clamps or fully autoclaved steel clamps. We never ratchet the clamp tightly. It should hold the skin gently. excessively tight clamping cuts off blood flow and distorts the tissue shape, leading to crooked piercings when the clamp is removed.
Mosquito Forceps (Hemostats)
These look like scissors but have a locking ratchet and blunt, serrated jaws.
Usage: We do not pierce with these. They are “fingers of steel.” We use them to hold tiny jewelry balls, grasp the back of a labret post, or manipulate gauze.
Sterile Hand: They allow you to manipulate non-sterile items (like a waste bag) without touching them with your gloved hands (if you use the “clean hand/dirty hand” technique, though usually, we keep them sterile).
The Receiver Tube
A hollow steel or glass tube, open at both ends.
Usage: Used for nostrils and cartilage. You place the tube behind the tissue (e.g., up the nose).
Function:
Counter-Pressure: It gives you a hard surface to push against, preventing the nostril from collapsing.
Safety: It “catches” the sharp needle tip as it exits the tissue, preventing you from stabbing the client’s septum or your own finger.
3. The “Freehand” Philosophy
At PinkTatPier, once you reach Senior Stylist level, you will likely abandon clamps for many procedures. This is the Freehand Technique.
The Logic: When you clamp tissue, you flatten it. A navel or an eyebrow looks different when squashed by metal forceps. A piercing that looks straight in the clamp might look crooked once the tissue springs back to its natural shape.
The Method: You use your fingers (and a sterile piece of gauze for grip) to support the tissue. You rely on visual alignment and tactile feedback.
The Result: Often superior for anatomy-dependent piercings like eyebrows, navels, and genitals. It is also less painful for the client, as the “pinch” of the clamp is often worse than the needle itself.
4. The Dermal Punch & Taper
Specialized tools for specialized jobs.
The Taper: A pin that starts thin and gradually thickens to the gauge of the jewelry.
Usage: Vital for jewelry installation. If a piercing has shrunk slightly, or during the transfer of jewelry, the taper guides the post in without scratching the delicate healing channel.3
The Dermal Punch: A circular, razor-sharp cookie cutter.
Usage: Used for removing a core of cartilage (e.g., thick outer conch piercings).
Legal Warning: In many jurisdictions, removing tissue is considered “medical surgery” and is illegal for piercers. In the UK, usage is a grey area often restricted by local council bylaws. PinkTatPier protocol restricts punches to specific licensed senior staff only
5. The Engine Room: Sterilization Machinery
Finally, we return to the machinery that makes this all possible. We discussed the process in Chapter 2, but let us look at the hardware.
The Vacuum Autoclave (Class B)
This is the washing machine-sized unit in the back room. It processes the bulk of our tools (clamps, tubes) in pouches. It is slow (45–60 minute cycles) but thorough.
The STATIM (The Cassette Autoclave)
This is the Ferrari of sterilization.
The Speed: It can sterilize a wrapped cassette of jewelry or tools in roughly 6–10 minutes.
The Usage: This allows for “Flash Sterilization” (though we follow full cycles). It enables us to sterilize jewelry on demand.
Scenario: A client points to a specific gold attachment in the display cabinet. We do not touch it with dirty gloves. We place it in the Statim cassette. minutes later, it is sterile and ready for insertion. This “Just-In-Time” sterilization ensures the chain of sterility is never broken from display to body.
piercing training course
ChJewelry Science & Styling (The Money Maker)
Alchemy & Economics: Selling the Sparkle
Welcome to the Showroom.
Up until this moment, you have been learning how to be a clinician. You have studied bacteria, anatomy, and needle mechanics. Now, you must learn to be a Jeweler.
This chapter represents the difference between a struggling piercer and a wealthy one. The piercing fee pays your rent; the jewelry sales pay for your lifestyle. At PinkTatPier, we do not simply “put a stud in it.” We upgrade the client’s anatomy with high-precision engineering and precious metals.
You are the gatekeeper. The client trusts you to put something safe inside their body. If you put garbage in a fresh wound, you are not just a bad stylist; you are negligent.
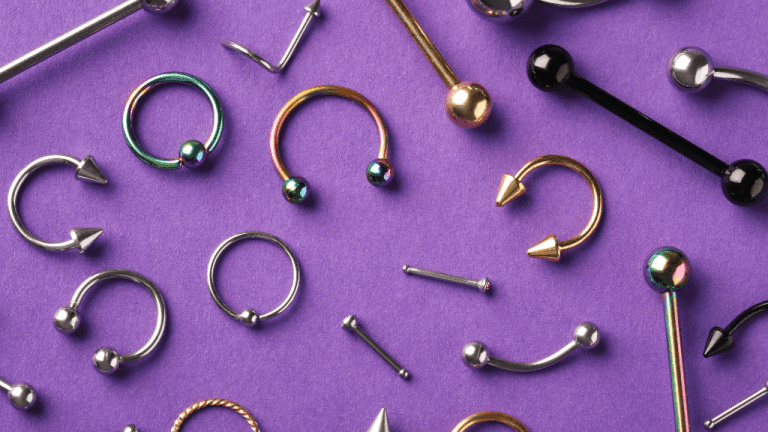
1. The Great “Surgical Steel” Deception
If you learn nothing else from this academy, memorize this: “Surgical Steel” is a marketing term, not a metal grade.
The Nickel Problem
Most cheap body jewelry is made of 316L Stainless Steel. While it is durable, it contains nickel.
The Reaction: When steel sits inside a healing wound (which is acidic and wet), the nickel leaches out into the bloodstream.
The Allergy: Nickel allergy is the most common metal allergy in humans.1 It causes contact dermatitis—redness, itching, weeping fluid, and the infamous “green skin.”
The Result: A client comes back with an “infected” ear. It isn’t infected; it’s an allergic reaction to your cheap jewelry.
The PinkTatPier Standard: Implant Grade Titanium (ASTM F-136)
We exclusively pierce with Titanium 6AL-4V-ELI, compliant with the ASTM F-136 standard.2
Bio-Compatibility: This is the same material used in heart valves, hip replacements, and dental implants. The body does not recognize it as a foreign object, so it does not attack it.
Weight: It is 45% lighter than steel.3 Heavy jewelry drags a piercing down; Titanium floats.
Zero Nickel: It is elemental and safe for MRI scans.
The Luxury Tier: Solid Gold & Niobium
14k / 18k Solid Gold: We never use “Gold Plated” or “Gold Filled” jewelry for initial piercings. Plating can chip off inside the wound, leaving jagged edges that harbor bacteria. It must be solid, nickel-free gold.
Niobium: A soft, elemental metal that can be anodized black.4 It is the only safe option for a “black” look in a fresh piercing (coated/painted steel is toxic).
2. The Mechanics of Connection: Threading Technology
How the gem attaches to the post is a matter of critical safety.
A. External Threading (The “Cheese Grater”)
Design: The screw threads are visible on the post (the part that goes through the ear).
The Danger: To insert this jewelry, you must shove those jagged screw threads through the raw, open wound. It acts like a file, ripping the delicate tissue you just tried to preserve.
Bacteria Trap: The threads are exposed to the “crusties” and lymph fluid, trapping bacteria that is impossible to clean.
Verdict: Strictly Banned.
B. Internal Threading (The Safe Option)
Design: The post is smooth. The hole inside the post is threaded. The decorative top has a screw attached to it.
The Benefit: Only smooth, polished metal passes through the piercing channel.
Verdict: Approved.
C. Threadless / Push-Fit (The Modern Standard)
Design: No screws. The decorative top has a thin pin that fits into a hollow post.
The “Bend”: You create a slight bend in the pin. When you push it into the straight post, the tension holds it locked in place.
The Advantage:
Universality: One top fits any gauge post (18g, 16g, 14g).
Security: Unlike screws, which can loosen with vibration, tension fittings rarely fall out.
Client Experience: Changing jewelry is faster and easier.
3. Anodizing: The 10-Second Customization
Titanium is naturally a dark silver colour. However, we can change its colour instantly using Electricity.
The Science: By dipping the Titanium into an electrolyte bath and applying a specific voltage, we change the thickness of the oxide layer on the surface.5 This refracts light differently.
The Palette:
65 Volts = Gold (looks like 14k Gold).
15 Volts = Dark Bronze.
90 Volts = Teal/Green.
100+ Volts = Fuschia/Purple.
The Business Value: A client wants the “Gold Look” but only has a £40 budget? You anodize a Titanium piece to “Gold” colour. You saved the sale.
4. The Art of Styling: The “Curated Ear”
In 2025, clients do not want random holes. They want a Constellation. This is where you become a Stylist.
The Principles of Flow
Anatomy First: Follow the natural ridges. If a client has a prominent Helix ridge, place studs along the curve like stars.
The “Rule of Triangles”: Group piercings in threes. A Tragus, a Rook, and a High Lobe create a visual triangle that balances the ear.
Texture Mixing: Do not just use simple balls. Mix:
Bezels: Smooth, modern.
Prongs: Classic, sparkly.
Chains: Connecting a Helix to a Lobe creates movement.
Hoops: Only for healed piercings (usually).
The “Project” Pitch
Never sell one piercing. Sell a project.
Bad: “Do you want your cartilage pierced?”
Good: “Looking at your ear shape, we could do a ‘Hidden Helix’ here with a diamond dangle, and balance it with a stacked lobe down here. It would frame your face perfectly. We can start with the Helix today.
piercing training course
5. Sales Psychology & The “Downgrade” Method
You are a professional. Do not shy away from the price. High prices reassure clients of quality.
The “Top-Down” Approach
When a client asks for a piercing, lead them to the Premium Cabinet (Solid Gold/Genuine Diamonds) first.
Why? It sets the anchor. “This genuine diamond rosette is £250.”
The Reaction: Even if they say it’s too expensive, the £65 Titanium Opal Cluster in the next cabinet now seems “cheap” by comparison. If you started with the £20 basic ball, the £65 option would feel expensive.
Managing Expectations (Downsizing)
You must explain that the jewelry they leave with is not the jewelry they keep forever.
The Swell Bar: Fresh piercings swell. We use a longer post initially.
The Downsize: “In 4 weeks, you must come back to buy a shorter post ($25). If you keep the long bar, it will snag and migrate.”
The Hook: This guarantees a second visit, which is a second opportunity to sell them more jewelry.
Practical Procedures & Aftercare
The Moment of Truth: From Marking to Healing
Welcome to the Chair.
You have the anatomy knowledge. You have the sterile field set. You have the gold jewelry anodized. Now, you have a human being sitting in front of you, and they are likely terrified.
This final chapter is where technical skill meets human empathy. A good piercer is 50% surgeon and 50% therapist. Your hand must be steady, but your voice must be soothing.
1. The “No-Numbing” Philosophy & The Breath
At PinkTatPier, we generally advise against numbing creams (Emla/Lidocaine) for standard piercings.
The Science: Numbing creams are vasoconstrictors. They shrink blood vessels and slightly alter the texture and shape of the skin (making it rubbery/spongy).
The Risk: When the numbness wears off, the tissue expands back to its normal state, which can cause the piercing angle to shift, leading to crooked healing.
The Reality: A piercing takes 1 second. The pain is a sharp scratch. The anticipation is worse than the event.
The Exhale Technique
We control pain through breathing.
Instruction: “Take a deep breath in through your nose…”
Action: Align the needle.
Instruction: “…and a long, slow breath out through your mouth.”
The Pierce: We pierce on the exhale. When the body exhales, the muscles relax, and the diaphragm drops. This naturally lowers the pain threshold. The needle passes through during this relaxation window.
2. Walkthrough: The Standard Lobe & Helix
Procedure A: The Standard Lobe
Marking: Client stands or sits neutral. Mark a dot in the center of the lobe. Check: Use calipers to ensure distance from the face is identical on both ears. Hand the client a mirror. They must approve the dot verbally.
Clamp: Apply the Pennington clamp. The dot should be “floating” in the center of the window. Do not squeeze too hard.
Alignment: Check your 90-degree angle from the side and top.
The Pierce: “Deep breath in… exhale.” Push the needle through in one smooth motion. Place the cork/receiver tube behind the ear to catch the tip.
Transfer: Slot the jewelry post into the back of the needle. Push the needle through, guiding the jewelry in.
Secure: Snap the threadless top into place.
Procedure B: The Helix (Cartilage)
Marking: Identify the “scapha” (flat area) or the curled rim. Ensure the back of the ear has space for the flat-back disc (it shouldn’t hit the skull).
Support: Often done freehand or with a receiver tube.
The Crunch: Warn the client: “You might hear a small pop or crunch. That is normal.”
The Pierce: Cartilage is denser. It requires slightly more force, but never speed. Controlled pressure is key. If you rush, you shatter the tissue.
Compression: Cartilage bleeds. Immediately after the transfer, apply sterile gauze with pressure for 30 seconds to stop the initial flow.
3. The Crisis: Fainting (Vasovagal Syncope)
It happens to the big tough guys more than anyone else.
Signs: Client goes pale, sweats on the upper lip, eyes roll back, yawning.
Action:
STOP. Do not try to finish the jewelry insertion if they are falling.
Position: Put their head between their legs or lay the chair flat immediately. Get the blood to the brain.
Sugar: Give them a lollipop or dextrose tablet (kept in your station).
Reassure: “It’s a normal adrenaline drop. Take your time.”
4. Aftercare: The “LITHA” Method
The internet is full of terrible advice. No Tea Tree Oil. No Aspirin Paste. No Alcohol. No twisting the jewelry.
At PinkTatPier, we follow the LITHA protocol: Leave It The Hell Alone.
The Physiology: The body knows how to heal a wound. It sends lymph fluid and white blood cells to the site. If you constantly touch, twist, or put harsh chemicals on it, you destroy the new cells trying to bridge the gap.
The Only Product: Sterile Saline Solution (0.9% NaCl) in a pressurized spray can (e.g., NeilMed).
Routine:
Spray morning and night.
Pat dry with non-woven gauze (or use a hair dryer on cool setting). Moisture is the enemy of healing.
Do not twist. Twisting tears the healing fistula (the skin tube) and drags crusties inside the wound.
5. Troubleshooting: Bump vs. Keloid
Clients will panic when they see a bump. You must diagnose it correctly.
A. The Irritation Bump (Hypertrophic Scarring)
Appearance: A small, red or flesh-colored bump right next to the hole. Usually fluid-filled.
Cause: Mechanical irritation. Sleeping on it? Angle crooked? Jewelry too long? Prongs rubbing?
Solution: Remove the source of irritation. Downsize the bar. Use a hot compress. It will go away.
B. The Keloid
Appearance: A large, shiny, bulbous growth that extends beyond the original wound site. It feels hard and rubbery.
Cause: Genetic disorder. If they don’t have keloids elsewhere, they probably don’t have one on their ear.
Solution: Refer to a Dermatologist. A piercer cannot fix a keloid. It requires steroid injections or surgical removal.
C. The “Infection”
Signs: Hot to the touch, throbbing pain, dark red streaks radiating from the site, thick yellow/green pus (not lymph).
Action: Do not remove the jewelry (it acts as a drain). Refer to a Doctor for antibiotics immediately.
confidential appointment
Closing: The PinkTatPier Standard
You have now completed the theoretical framework of the PinkTatPier Academy.
We have traveled from the microscopic world of Hepatitis B to the physics of beveled needles, and finally to the psychology of the client in the chair.
Body piercing is an ancient ritual modernized by science. It is a career that offers artistic freedom, human connection, and financial independence. But it is a career that unforgivingly punishes shortcuts.
If you respect the anatomy, honor the hygiene, and invest in the best materials, you will not just be a piercer—you will be a trusted authority in the body art industry.